How to Properly Measure Your Horse's Hoof
We cannot over stress the importance of resizing! You wouldn't go for a jog in ill-fitting sneakers, so why would you expect your horse to do the same?
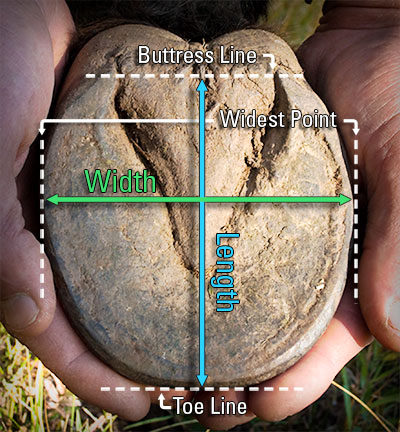
- After a fresh trim, measure the width of the hoof across the bottom at the widest point.
- Measure the length of the hoof from the toe to the buttress line of the heel. The buttress line is the farthest weight bearing point of the heel where the hoof wall ends. Do not include the heel bulbs in the measurement.
- Compare your measurement with the appropriate size chart. Please note that each boot style has its own unique size chart.
- Ideally, the length and width measurement will fit into the same size. If the length and width measurements indicate different sizes, select the larger size. If the hoof measurements fall closely to the maximum length or width, we recommend choosing the next size up. If the width and length measurements are different by more than one size, your selected boot style is not recommended. * Be sure to check your measurements against an alternative boot in the EasyCare line—another style may accommodate your horse’s hoof shape better.
*Note: If you are fitting an Easyboot Glue-On or Glove, width and length must fall into the same size category.
Fitting Assistant
Prepare Diligently
- Use a late-model smartphone or a digital point-and-shoot camera with an LCD screen and memory card.
- If using a digital camera, the best setting to use will be Auto or Portrait mode. Avoid the Macro setting, denoted with a small flower because you will need to be within inches of your subject and there is a very small/shallow depth of field. This can cause blurry pictures.
- Do not use flash because it washes out the subject. Use natural light with no shadows. It is optimal to photograph in an even-shaded area. Avoid bright sun, deep shade or mottled shade.
- Take the picture on a clean and level surface that is free from clutter (your tools, hoofjack, shavings/straw, etc).
- Use a rubber mat or cement/pavement in the barn aisle for the horse to stand on if one is available.
- Clean your horse’s hooves meticulously. Use a stiff brush to clean all mud, dirt, debris from the wall, sole, frog, collateral grooves and heels.
Once all the prep work is done, it’s time to take the pictures. Stand the horse on the level ground with “a leg at each corner”. The horse should be loading each hoof equally. Avoid a stretched-out stance and resting/cocked hind legs.
Taking Pictures
- Take your pictures in sequential order:
Left Front:
a. Left front lateral or medial (from the side - lateral is on the outside of the hoof, medial is on the inside of the hoof)
b. Left front dorsal (from the front)
c. Left front caudal (from behind)
d. Left front solar (from beneath)
Do the same series on the right side, and for other hooves you would like us to evaluate. This will help to know which hoof you are looking at when you are labeling your pictures. It will be easier if you always shoot in the same order.
- To take the pictures, position yourself perpendicular to the horse or hoof. For hoof shots, get your camera down on the ground and perpendicular to the hoof. Caudal and solar shots need to be from directly over and square to the heels or sole. Important: fill your screen with the subject, allowing only a small margin surrounding the subject. Load the photos onto your computer.
- Label each photo accurately before uploading them with the Fitting Assistant form below.